

By Steve Theunissen
Experiencing different cultures, landscapes, and foods when travelling broadens your horizons and enriches your life. But it can make maintaining your fitness routine a real challenge.
The attractiveness of regional cuisine, erratic schedules, and restricted access to conventional gym facilities make it all too easy to ditch your workouts while on vacation.
Yet, maintaining your fitness routine while travelling doesn’t have to be complicated.
Here’s a 10-exercise bodyweight travel workout that keeps you active, energized, and in shape no matter where your adventures take you.
Why Opt for Bodyweight Workouts When Traveling?
Bodyweight exercises are a traveller’s best friend when it comes to fitness, thanks to their adaptability to a variety of circumstances.
Exercises using only your body weight do not require specialized equipment because you use your own body as resistance. This makes them an accessible alternative for travellers because you can perform good workouts without relying on gym access (similar to Wall Pilates, a spin on traditional Pilates that incorporates the use of a wall for resistance with classes on your device).
You can get your workout in at a park, the beach, or right in your hotel room.
Preparing for Your Bodyweight Travel Workout
Here are some things you can do to lay the groundwork for a bodyweight travel workout:
- Comfy Workout Clothing and Proper Footwear: You can move quickly and freely while exercising with appropriate fitness clothing. Choose clothing that allows for a complete range of motion and textiles that wick away sweat to keep you cool and dry. Choose training shoes that offer sufficient support for your feet when performing dynamic activities like jumping or lunging.
- Use Available Exercise Space: Ensure your safety and freedom of mobility by removing any objects from the area that can get in the way of your workouts.
- Including a Warm-Up Exercise Before Every Workout: Before beginning any fitness program, it is essential to warm up. The benefits of a dynamic warm-up include increasing blood flow to your muscles, preparing your joints for action, and lowering your chance of injury. Perform dynamic stretches like arm circles, leg swings, hip rotations, and light cardio (such as stationary jogging).
- Hydration and Food: Have a water bottle on hand that you can sip from throughout the workout. Eat a light meal that combines simple carbs with protein about 30 minutes before the travel workout, such as mashed banana on toast.
10 Essential Bodyweight Exercises for Travellers
Exercise #1: Push-Ups
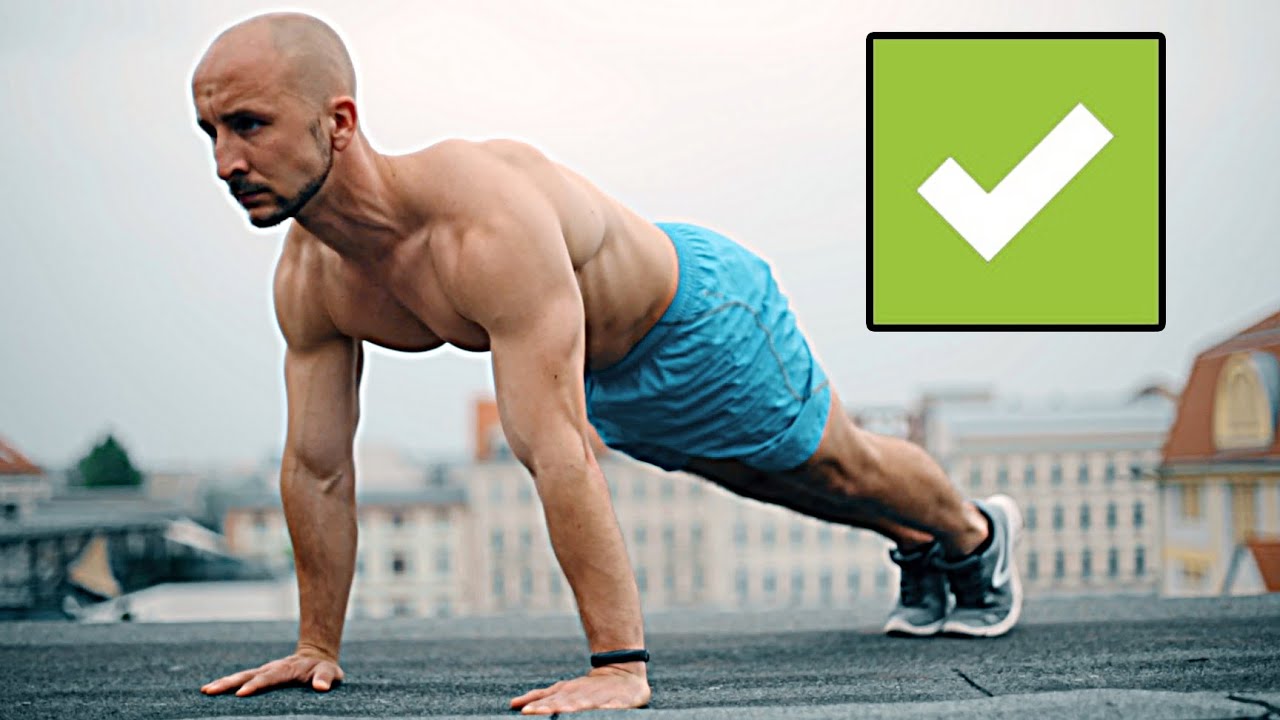
Step-by-Step Guide:
- Start in a high plank position, keeping your hands slightly wider than shoulder-width apart and pointed forwards. From head to heels, your body should be in a straight line.
- Keep your elbows near your torso while lowering your body to the floor. Maintain a straight line from your head to your heels by engaging your core. A complete range of motion Without letting your hips sag or your lower back arch, lower your body until your chest is a few inches off the ground or as low as your flexibility will allow.
- Return to the plank position by pushing through your palms and straightening your arms. Throughout the movement, maintain a neutral spine and a tight core.
Exercise #2: Body Weight Squats

Step-by-Step Guide:
- Stand with your feet hip-width apart and your toes pointing outward. Maintain an upright torso with your spine in a natural arch.
- Bend your knees and hinge your hips back as if sitting in a chair. Keep your core tight and your chest high.
- Keeping your spine neutral, lower your body till your thighs are parallel to the floor or as far as your flexibility will allow.
- Drive through your heels to straighten your legs. As you reach the top of the exercise, fully extend your hips.
Exercise #3: Plank
Step-by-Step Guide:
- Lie face down on the floor. Ensure your elbows are squarely beneath your shoulders as you prop yourself on your forearms. Your arms ought to be parallel to one another.
- With your toes tucked under, extend your legs behind you. Your body should form a straight line from head to heels, with your core contracted for stability.
- Focus on maintaining a neutral spine; refrain from letting your hips sink to the floor or elevating them excessively. Your body needs to be in one continuous line.
- Maintain a focused look on the ground while ensuring your neck and spine are aligned.
- Maintain this position for a predetermined amount of time, beginning with a length of time that tests you without compromising form. 20 to 60 seconds are typical durations.
Exercise #4: Lunges

Step-by-Step Guide:
- Stand tall, with your feet hip-width apart and your arms at your sides.
- Take a large step forward with one leg in a smooth motion. Your level of comfort and mobility will determine how long your stride is.
- Lower your body by bending both knees until your front thigh is parallel to the ground and your rear knee floats just above it. Position your front knee so that it is directly over your ankle. Keep your upper body straight, your shoulders back, and your core engaged for stability.
- Push through the front foot’s heel to return to the start position, using the strength of your front leg.
- After finishing the required number of reps on one leg, repeat with the other leg.
Exercise #5: Tricep Dips
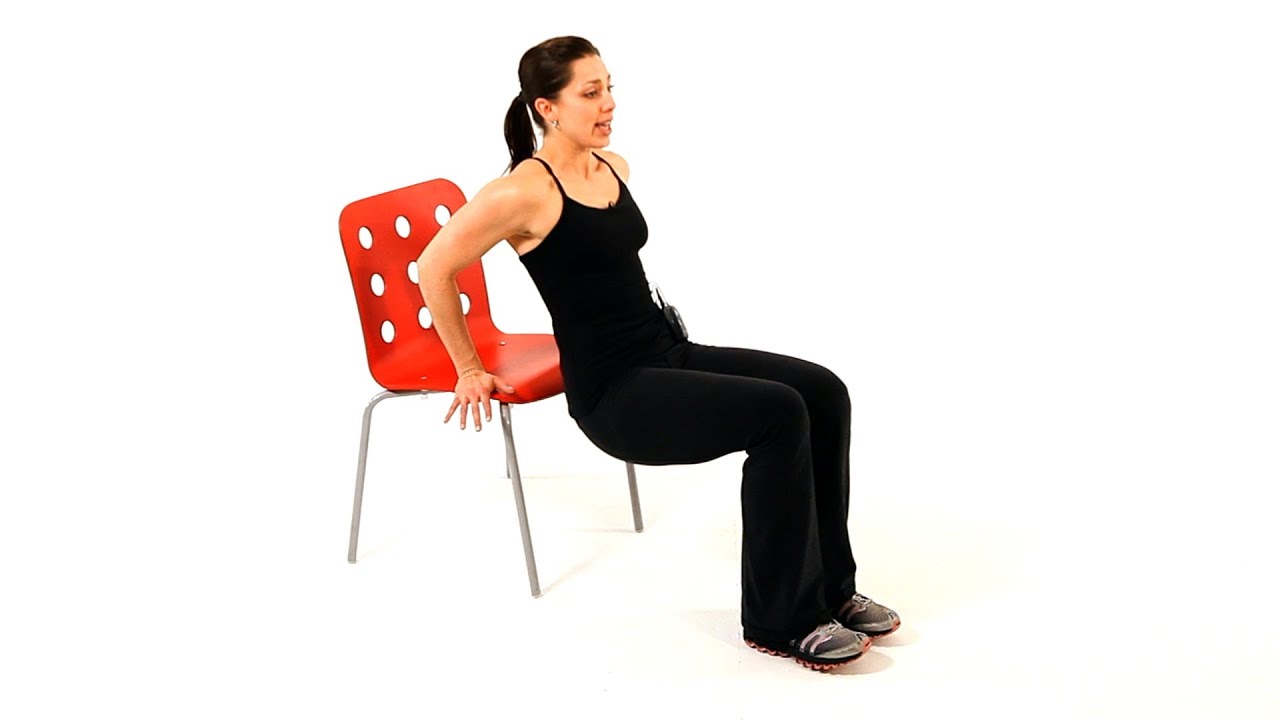
Step-by-Step Guide:
- Locate a firm surface, such as a step, bench, or chair. Place your hands on the edge of the surface beside your hips and sit on it. Your palms should be down, and your fingers should be pointed forward.
- Leaning on your hands for support, slide your hips forward off the bench. Place your feet flat on the ground and bend your knees at a right angle.
- Bend your elbows to lower yourself until your triceps are almost parallel to the surface you’re using or until your upper arms are parallel to the floor.
- Press through your palms to return to the start position. Maintain a tight core the entire time you’re moving.
Exercise #6: Bridge Pose

Step-by-Step Guide:
- Lie on your back with your knees bent and feet flat on the ground, lie on your back. Your arms should be next to your body, with your hands facing down. Your feet should remain hip-width apart.
- Press through your heels and contract your glutes and core muscles to lift your hips into the air. As you elevate your hips, try to move one vertebra at a time up through your spine. Lift up gradually from the tailbone until your upper back and shoulders are off the floor.
- Slide your shoulders under your body and interlace your fingers together from below. Your shoulders, upper arms, and feet should all bear an equal amount of your weight. Do not strain your lower back or apply too much pressure to your neck.
- Hold the bridge pose for a few breaths, maintaining a comfortable alignment. Pay attention to your breathing while allowing your chest to rise towards your chin.
- Unlock your fingers and slowly roll through your spine, bringing your hips back to the floor one vertebra at a moment.
Exercise #7: Mountain Climbers
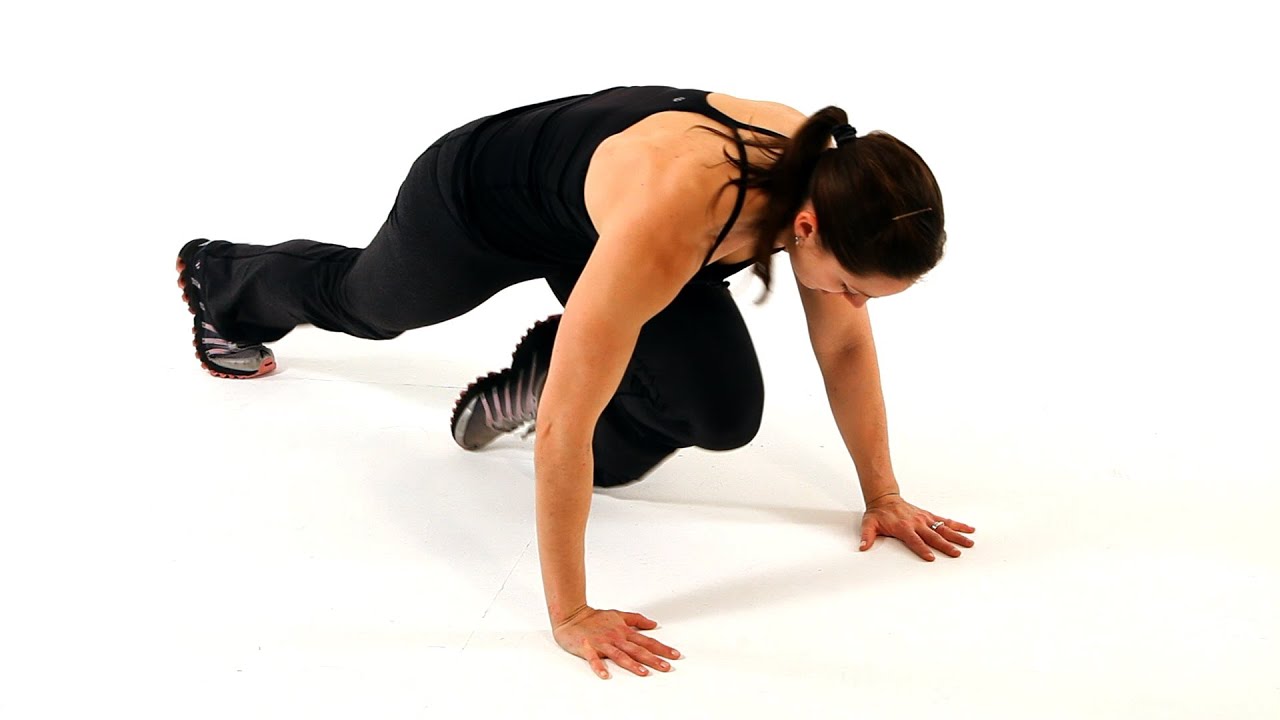
Step-by-Step Guide:
- Assume a high plank position, with your hands directly beneath your shoulders and your toes tucked under. From head to heels, your body should form a straight line.
- Drive one knee towards your chest while keeping the other leg extended. Contract your core muscles to stabilize your body,
- Driving the other knee towards your chest, quickly switch legs as you bring the first leg back to its starting position.
- Continue to move your legs in a running-like action alternately.
- While maintaining perfect form, try to move at a faster tempo to increase your heart rate. The intensity of the exercise increases with the speed of your leg alternations.
Exercise #8: Superman

Step-by-Step Guide:
- Lay face down on the floor with your legs extended and your arms out in front of you. Contract your core muscles to protect your lower back and stabilize your spine.
- Simultaneously lift your arms, torso, and legs off the ground, imitating the Superman flying position. Create a long and stretched line by reaching your arms and legs as far apart as you can while you lift.
- At the top of the movement, squeeze your glutes as well as your upper and lower back muscles. Hold for a 5-count.
- Slowly return to the start position by lowering your arms, chest, and legs.
Exercise #9: Leg Raises

Step-by-Step Guide:
- Lie flat on your back with your hands, palms down, at your sides.
- Lift both legs off the floor while maintaining a straight, stretched posture. Stabilize your lower back by contracting your abdominal muscles.
- Slowly lowering your legs back towards the floor while keeping control of the movement is known as a controlled descent. Avoid contacting the ground with your feet; they should barely be off it.
- Controllably raise your legs back to the starting position, activating the movement with your core muscles.
Exercise #10: Burpees
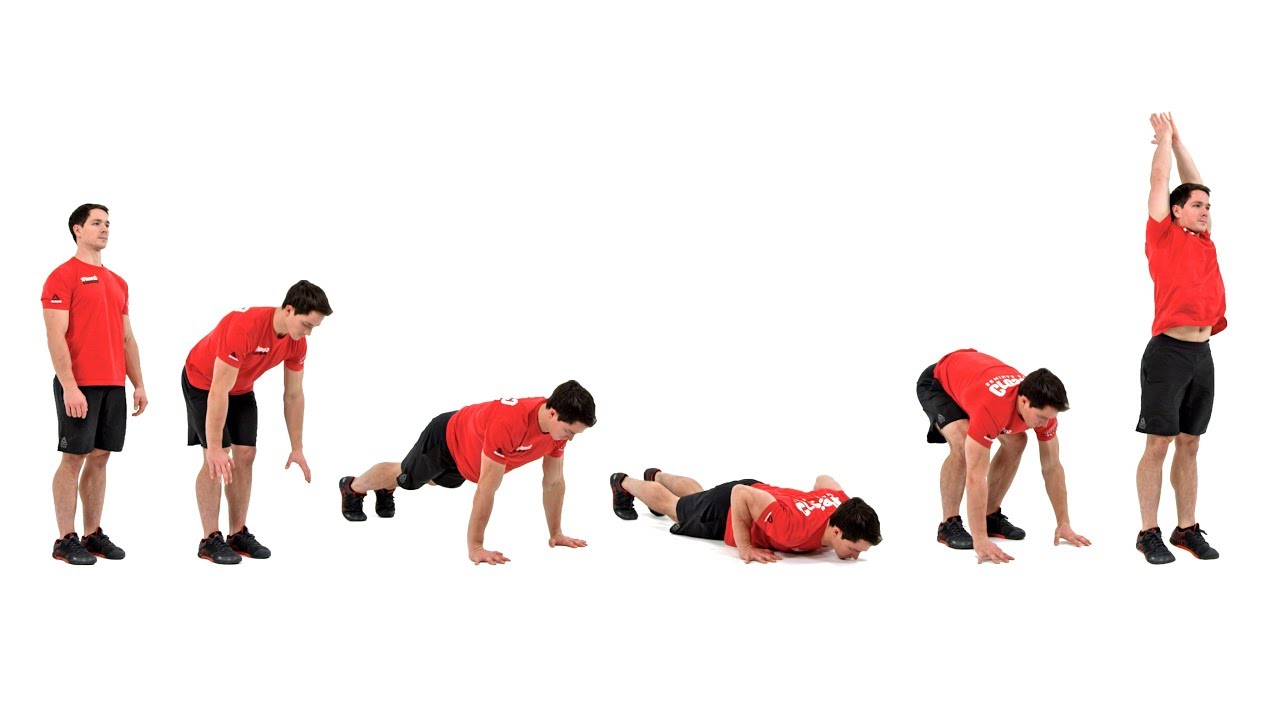
Step-by-Step Guide:
- Stand with your feet hip-width apart.
- Drop down to bring your palms to the ground just outside shoulder width and your feet back to full leg extension. You should land in a high plank position. From head to heels, your body should form a straight line.
- Perform a standard push-up.
- Jump your feet forward.
- Reach your arms overhead while jumping vertically to return to the start position.
The Workout
This travel workout is designed to be performed in a circuit style, where you go through one set of all ten exercises with no or minimal rest between them. You then rest for 2 minutes and repeat the circuit. Work up to completing three rounds of the circuit:
- Push-Ups: 12 reps
- Bodyweight Squats: 15 reps
- Tricep Dips: 10 reps
- Mountain Climbers: 20 reps (10 per leg)
- Bridge Pose: Hold for 30 seconds
- Leg Raises: 12 reps
- Superman: Hold for 20 seconds
- Lunges: 12 reps (6 per leg)
- Burpees: 8 reps
- Plank: Hold for 40 seconds
Bonus Section: 5-Exercise Dumbbell Workout
Want to add a more significant resistance challenge to your travel workout? Dumbbells will get you from skinny to buff faster than your body weight.
Here’s a complete body 5 exercise workout using dumbbells. Pick up a pair of travel-friendly adjustable dumbbells, and you’ll be good to go.
Dumbbell Exercise #1 – Goblet Squat

Step-by-step guide:
- Grip the top of a dumbbell held vertically near your chest.
- Stand with your feet shoulder-width apart and your toes slightly pointed out.
- Perform a squat by lowering your body while maintaining a straight back and an upright posture.
- Drive through your heels to return to the start position.
Dumbbell Exercise #2 – Dumbbell Lunges

Step-by-step guide:
- Hold a dumbbell at your sides in each hand.
- Take a large step forward with one leg in a smooth motion.
- Lower your body by bending both knees until your front thigh is parallel to the ground and your rear knee floats just above it.
- Keep your upper body straight, your shoulders back, and your core engaged.
- Push through the front foot’s heel to return to the start position, using the strength of your front leg.
- After finishing the required number of reps on one leg, repeat with the other leg.
Dumbbell Exercise #3 – Dumbbell Rows

Step-by-step guide:
- With feet shoulder-width apart, hold a dumbbell in each hand, palms towards your torso.
- Maintain a straight back while bending at the hips.
- Pull the dumbbells to your hip region while pressing your shoulder blades together.
- Lower under control and repeat.
Dumbbell Exercise #4 – Dumbbell Shoulder Press

Step-by-step guide:
- Hold a dumbbell in each hand at shoulder height with the palms facing forward.
- Press the weights overhead, stopping just short of full extension.
- Lower under control back to your shoulder level and repeat.
Dumbbell Exercise #5 – Dumbbell Deadlifts

Step-by-step guide:
- Hold a dumbbell in each hand in front of your thighs, palms towards your body.
- Hinge at the hips while maintaining a straight back and slightly bent knees to lower the dumbbells toward the floor.
- Push through your heels and use your glutes and hamstrings to return to the start position.
- Perform three sets of 8-12 reps on each of these dumbbell exercises.
- Rest for 60-90 seconds between sets.
And that concludes the bonus 5-exercise bonus workout. Check out these dumbbell exercises for more ideas on how to put your dumbbells to good use during your travels. And if you need help making exercising a habit, these 10 tips will help you get into and stay in a great exercise routine.
Wrap Up
Staying in shape while working out doesn’t have to go in the too-hard basket. The body weight workouts we’ve laid out can help you turn any area into your own personal fitness haven.
So, pack your sense of adventure, gather your activewear, and head out on your trip, knowing that you’ve got your travel workouts covered.
Your body will thank you, and your travel memories will be more vivid as a result.
Steve Theunissen joined his first gym at age 15 and, five years later, was managing his own studio. In 1987, he became the first personal fitness trainer in New Zealand, and over the past decade, he has built a freelance fitness writing career to share his fitness passion with the world.